Hi everyone! This blog post will be about Generator function that was introduced in ES6.
Mozilla’s definition of Generator states the following:
Generators are functions which can be exited and later re-entered. Their context (variable bindings) will be saved across re-entrances.
In another words, Generator Functions are functions that can be paused at arbitrary points and be resumed when specified.
To demonstrate, below is a regular function that outputs ‘one’ and ‘two’ when it is invoked.
function regular () {
 console.log('one');
 console.log('two');
}

regular();
It’s very simple. At the time of compilation, the regular() is invoked and outputs ‘one’ and ‘two’ into the console.
The generator function takes a different approach. We first define a generator by placing an asterisk (*) after the function keyword:
/* Note the asterisk after the 'function' */
function* generator() {
 console.log('uno');
 console.log('dos');
}

const g = generator();
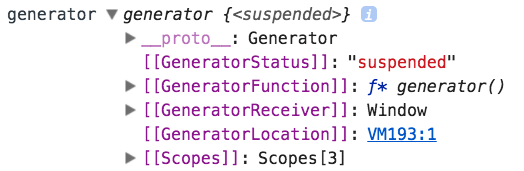
When generator function is invoked, it does not run instantaneously. Let’s investigate further with the debug statement:
console.log('generator', g);
Below is the snippet from Google Chrome Console. We see that generator() returns the instance of the function at suspended state.
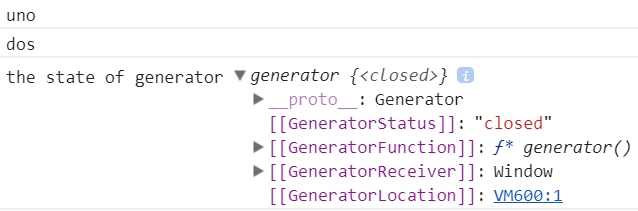
How do we get the generator function up and running? The function starts running when the following method is invoked:
g.next();
console.log('the state of generator', g);
At every generator function, an invisible block is placed at the very beginning of its scope, halting its progress.
The next() method jumps over the block and allows the function to run.
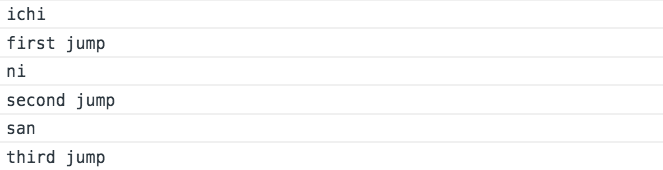
The generator function starts to get more interesting as you can place pause at arbitrary locations with yield.
function* generator() {
// <-- first pause
console.log(‘ichi’);
yield; // <-- second pause
console.log(‘ni’);
yield; // <-- third pause
console.log(‘san’);
}


const g = generator();
g.next();
console.log('first jump'); //jumps over the first pause at the beginning.
g.next();
console.log('second jump'); //jumps over the pause placed by the first ‘yield’
g.next();
console.log('third jump'); //jumps over the paused placed by the second ‘yield’
Once invoked, the function is paused at the beginning by default. When `next()` is used, it starts to unleash the floodgate:
Moving on, the following code example illustrates a simple relay race. The race starts with Runner A’s (really short) 20 meter sprint. Once she reaches the 20 meter mark, she passes the baton to Runner B. The Runner B sprints the remaining 20 meter to the finish line.
This relay race code example is aimed to demonstrate two main ideas:
1. Generator iteration is utilized to avoid manually invoking the `next()`
2. Communication between multiple generator function is possible.
Below is the aforementioned code.
function* runningTeam() {
 const A = 'Runner A';
 const B = 'Runner B';

 yield* runnerA(A);
 yield `${A} passes the batton to ${B}`;
 yield* runnerB(B);
 yield `${B} finished the race`;
}

function* runnerA(name) {
 yield `${name} ran 5 meter`;
 yield `${name} ran 10 meter`;
 yield `${name} ran 15 meter`;
 yield `${name} ran 20 meter`;
}

function* runnerB(name) {
 yield `${name} ran 5 meter`;
 yield `${name} ran 10 meter`;
 yield `${name} ran 15 meter`;
 yield `${name} ran 20 meter`;
}

const trackField = function() {
 for(let i of runningTeam()) {
   console.log(i);
 }
}

trackField();
I admit that this is a lot to throw in at once. So here is my best attempt to break it down by going through the two main idea mentioned above:
1. Generator iteration is utilized to avoid manually invoking the next()
Earlier, I briefly explained the next() method is used to jump over the breakpoint set by yield . But with many yield used in this runner example, manually invoking the next() multiple times can easily turn tedious.
To avoid tedium of invoking multiple next(), for in loop was used to walk through the generator function automatically. In this example, the for in iterates through the race’s progression as well as the runners’ respective 20 meter sprint.
const trackField = function() {
  for(let i of runningTeam()) {
   console.log(i);
  }
}
Inside thefor in loop shown above, the values provided with yield statement are iterated and output to the console. Both Runner A and Runner B will iterate the following yield statement:
yield `${name} ran 5 meter`;
yield `${name} ran 10 meter`;
yield `${name} ran 15 meter`;
yield `${name} ran 20 meter`;
2. Communication between multiple generator function is possible
In this example, there are 3 generator functions that communicate with one another: runningTeam(), runnerA(), runnerB().
The trackField function iterates through the runningTeam() seen below:
function* runningTeam() {
 const A = 'Runner A';
 const B = 'Runner B';

 yield* runnerA(A);
 yield `${A} passes the baton to ${B}`;
 yield* runnerB(B);
 yield `${B} finished the race`;
}
The runningTeam() generator function contains 4 steps:
1. Iterate through the runnerA() function.
2. Runner A passes baton to Runner B
3. Iterate the runnerB() function.
4. Announce that RunnerB finished the race.
When the entire code is put to the test, you will see the following output:
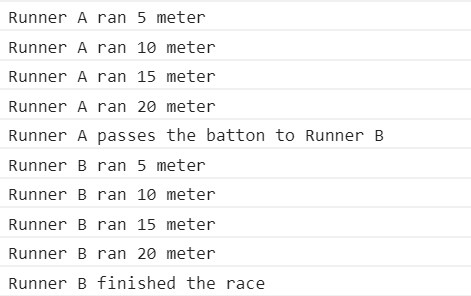
We see the iteration through runnerA() in action before Runner A passes the baton to Runner B. runnerB()iterated and the race is finished soon after.
And that concludes the basics of the generator function. But there still is that important question that I haven’t answered yet in the forms of: “What’s so special about the generator function?!” Or “Why iterate through the generator when I can do the exact same thing with for loop?!”
The code example shown in this blog has been working with synchronous operations. The generator function becomes very useful when you are working with asynchronous operations. For example, it comes in pretty handy to hold off on the function’s progress until the asynchronous operations return either a successful or failed promises.
In the next post, I’ll cover how the generators are used with the asynchronous operations. I promise that the next one will be more interesting than this one.
Stay tuned! And in case you missed it, please give this post a read: Achieving Concurrency with Async and Await as the next blog post will deal heavily with the async operators.
Thank you for reading!