Overview
What is oAuth?
OAuth 2.0
OAuth 2.0 is the industry-standard protocol for authorization. OAuth 2.0 supersedes the work done on the original OAuth protocol created in 2006.
The new version focus on client develop simplicity, and provides specific flows for Web, Desktop and Mobile developments.
Components
- Client
- Resource Server
- Authorization Server
- Resource Owner
Client (The Third-Party Application)
Is the application that is attempting to get access to the user’s account. It needs to get permission from the user before it can do so.
Resource Server (The API)
This is the server or service used to access user’s information through an API.
The Authorization Server
This server presents the interface where the user approves or denies the request. In smaller implementations, this may be the same server as the API server, but larger scale deployments will often build this as a separate component.
Resource Owner (The User)
The resource owner is the person who is giving access to some portion of their account.
Protocol Flow
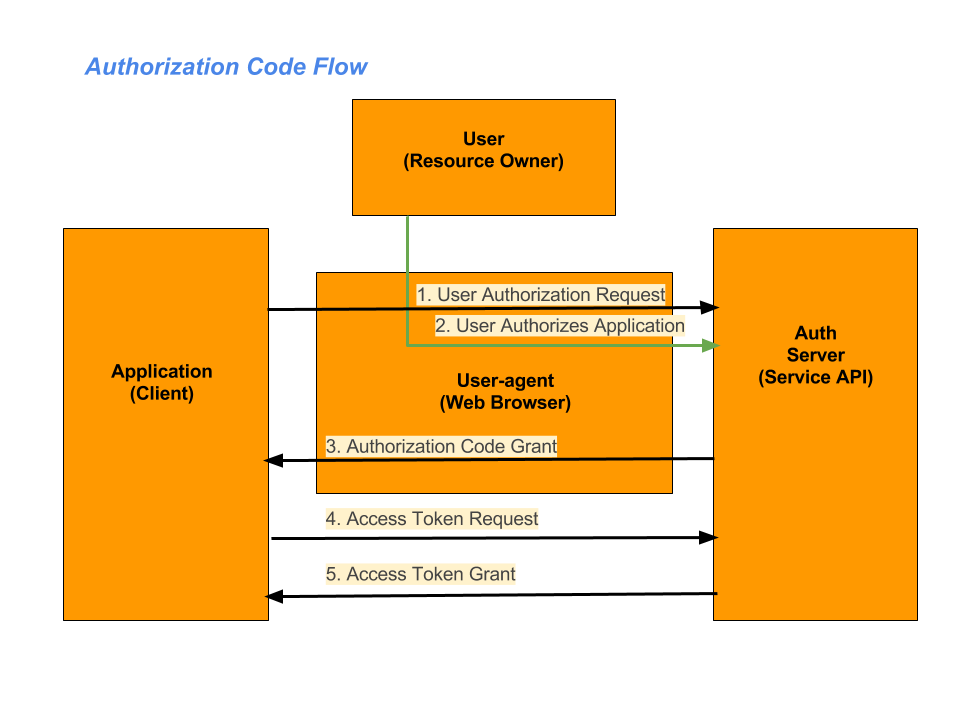
- The application requests authorization to access service resources from the user
- If the user authorized the request, the application receives an authorization grant
- The application requests an access token from the authorization server (API) by presenting authentication of its own identity, and the authorization grant
- If the application identity is authenticated and the authorization grant is valid, the authorization server (API) issues an access token to the application. Authorization is complete.
- The application requests the resource from the resource server (API) and presents the access token for authentication
- If the access token is valid, the resource server (API) serves the resource to the application
You can implement this abstract flow in different ways based on the target architecture: Web Application and Client Application. Where the first one could be any of common web sites that allow us to login using our Facebook or Twitter user, and the last one could be a mobile or desktop app.
In both cases, before start using oAuth, you need to register the application in the Service Provide system, that way you will obtain a client_id and client_secret. The client_secret should be kept confidential and only used between application and Service Provider.
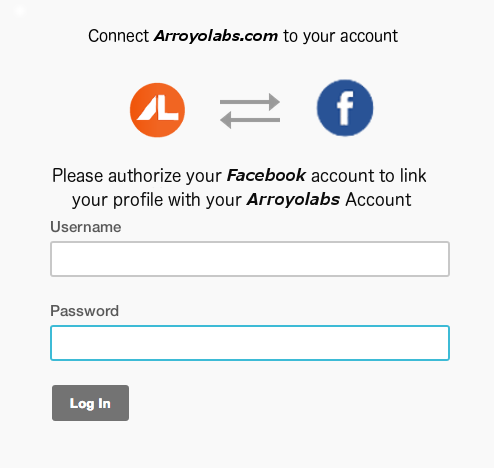
Once you have registered your app, the first step is to get authorization from the user.
This is usually accomplished by displaying an interface provided by the service to the user.
The version 2 provides several “grant types” for different use cases. The grant types defined are:
- Authorization Code for apps running on a web server, browser-based and mobile apps
- Password for logging in with a username and password
- Client credentials for application access
- Implicit was previously recommended for clients without a secret, but has been superseded by using the Authorization Code grant with no secret.
The first step is create a login link to redirect a user to Auth Server where will be authenticated. This link might include the callback URL (this could vary depends on server implementations, some systems require the callback URL in the app registration form). This is the URL user will be redirected to after login.
In case of success this redirect will include a Grant Code, that will be needed in the Token Exchange step.
After a succeed login, with Grant Code and Access Token the client app, will request the access token, that will be used as credential on future request.
Final thoughts
Hope this roughly overview brought up some light into the oAuth Protocol concepts. In the next episode, I will bring you a practical example of how to implement a client module with erdiko/authenticate package.